How many times have you cleaned your oven? If your first thought is “I don’t think I’ve ever cleaned my oven!”, don’t worry, you are not alone.
The first oven I cleaned wasn’t mine, and to be honest, I had no idea where to start. I’ve heard of oven cleaners before, but they all screamed toxic chemicals to me. I knew the last thing I wanted to do was to stick my face inside an oven full of fumes that would leave me dizzy, with a headache and feeling upset that I put myself through such misery. I don’t think anyone with the right mind would put themselves through that and luckily we don’t have to! If you are looking to give your oven some much deserved attention and love the eco-Friendly way; you’ve landed in the right page.
There are two parts to a successful cleaning experience. The right tools AND the right mindset. We’ll start with the right tools, so here is what you’ll need:
- Bon Ami This is a natural powder cleanser, non-toxic and biodegradable. You can find it in Target, Walmart or your local grocery store.
- Pumice Stick This tool works through gentle abrasion and it won’t scratch the surface of the oven. We buy ours from Speed Cleaning because they have some amazing cleaning tools, but you may also find one at your local hardware store.
- Scouring Pads (Steel wool) I love these from Amway because they are made of high grade stainless steel; they won’t rust or fall apart. They also won’t scratch your glass (though I always recommend you check on a small part of the surface to make sure it’s safe for your glass). We use these scouring pads all the time in our cleanings.
- Microfiber cleaning clothes You can find them at your local hardware store as well, but the ones from Speed Cleaning are very high quality and durable. You’ll need a few of these to clean and polish as you go.
- Liquid soap. We highly recommend Amway’s Multipurpose Cleaner. This is a concentrated product, super efficient, and you can clean almost anything with it (even wash your hands). It’s a very economical choice. Did I mention it is also safe around kids, pets and the environment? Dawn dish soap also works great.
- A spray bottle with water (or Amway’s Multipurpose Cleaner mix)
- A sponge
- A few drops of Lemon Essential Oils to keep you energized while you clean. Because who doesn’t love a good smell? I assure you it will make your cleaning experience a lot more pleasant.
Now this is where the second part comes in: Your Mindset. Start with a good attitude, and be open to having fun in the process. Think about how good your oven will look and how satisfying it will feel when you are finished. And the most important part is: complete the cleaning in a systematic way; I assure you it will make the cleaning process fun and simple. Just follow the instructions below:
- Have all your tools ready and handy
- Have a plan of action: Clean in sections and from top to bottom, left to right. We suggest doing the wall behind first. Then the left, right, bottom and lastly; the door.
- Remove the racks and place them in your sink
- Wet the sponge with the spray bottle, sprinkle some bon ami and add a dab of Amway’s Multipurpose Cleaner or your liquid soap of choice and lightly scrub the mix into all the surfaces and the racks. Do not add any elbow grease at this point, the idea is to get the surfaces prepped and letting the cleaning agents start the cleaning for you. Let them sit for now.
- Add more bonami and liquid soap (as needed) and start applying it to all the walls: always moving your sponge from top to bottom. Do each one of the surfaces in the order we suggested.
- Wet the pumice stick with the spray bottle and start scrubbing the first surface, top to bottom and left to right. Add a dab of liquid soap if needed.
- Damp a microfiber towel and clean the surface to assess the progress on just one wall.
- Now, take the scouring pad, wet it with the spray bottle and add some Bon Ami and a dab of the liquid soap. In the same manner, (top to bottom, left to right) scrub the areas that still need some work. You may go back and forth with the pumice stick; just assess which one is doing the best work for you.
- NOTE: If you encounter any tough areas, don’t waste your energy. Skip them for now, we’ll tackle those areas back at the end.
- Breathe and take a break if needed.
- Repeat the process on each surface.
- When it comes to the glass, use the scouring pad first. Then, you can use the pumice stick lightly on the areas that still may need some extra attention.
- This is the time to go back to those stubborn areas. The pumice stick has more cleaning power and feel free to add some more bon ami or liquid soap.
- Now, use a damp microfiber cloth to wipe the surfaces. You may need to repeat this a few times to remove all the buildup you have removed and the cleaning mixture.
- Lastly, tackle the racks. Use the scouring pad with added bonami and liquid soap.
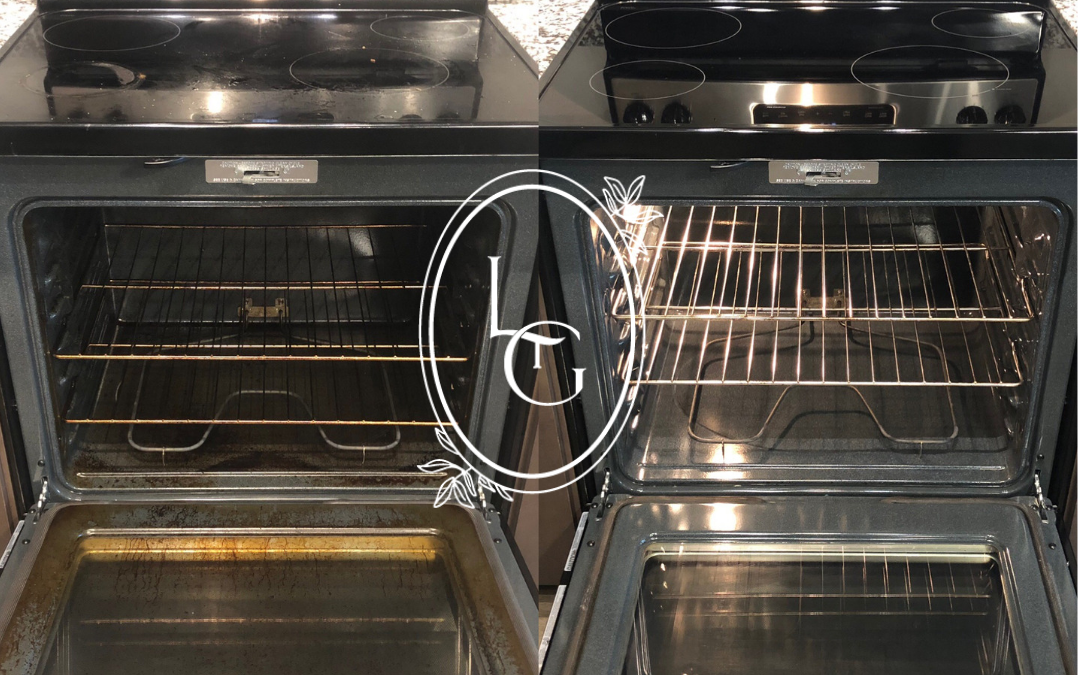
- Your oven should shining! You are all done!
How did your oven turned out?
Let us know in the comments 🙂